Using this guide you can easily Root Galaxy A5. Here we will flash a custom kernel and SuperSU file to get root access along with TWRP file to install Touch recovery. If you want to root galaxy A5 and install custom recovery then follow this guide completely, don’t skip any step.
Disclaimer: The guide only refers to Install TWRP Recovery and Root Galaxy A5 A500FU, A500G and A500M on Lollipop Firmware, don’t try on any other device. We www.guidebeats.com will not be held responsible for any mishaps during or after the process. Proceed at your own risk.
Pre-requisites:
• The guide works on Samsung Galaxy A5 A500FU, A500G and A500M. First check your device model No, via [Settings > About device]
• Take a proper backup of your important data on the device (Gallery items, contacts, app data, and other contents) before proceeding.
• Your device battery should be more than 70% charged.
• Install Samsung USB drivers on your computer. [Click here]
• Enable USB Debugging Mode on your device, via [Settings > Developer options]
• Also enable OME option if exist in [Settings > Developer options]
• Use original USB cable for seamless connectivity.
• Also disable Firewall, Antivirus and Samsung KIES on your PC.
Required downloads:
Download and extract Odin3 latest v3.10.6 on your PC. [Click here]
Download Custom Recovery twrp-2.8.7.0-a5ultexx-11112015.tar.md5 file on PC [Click here]
Download SuperSu.zip file and transfer it to your device’s internal storage. [Download here]
Steps to Install TWRP Recovery and Root Galaxy A5 running Lollipop
1) Open extract Odin3 folder on your PC and double click on v3.10.6.exe file to Run Odin tool.
2) Now enter Galaxy A5 into “Downloading Mode”, via [Press and hold Volume Down + Home + Power Key all at once for few seconds], when you see warning screen, press Volume UP key to continue.
3) Now connect your device with your PC via USB cable, Odin3 tool will detect your device and ID:COM box on Odin3 should turn blue. If doesn’t try to install correct USB driver again.
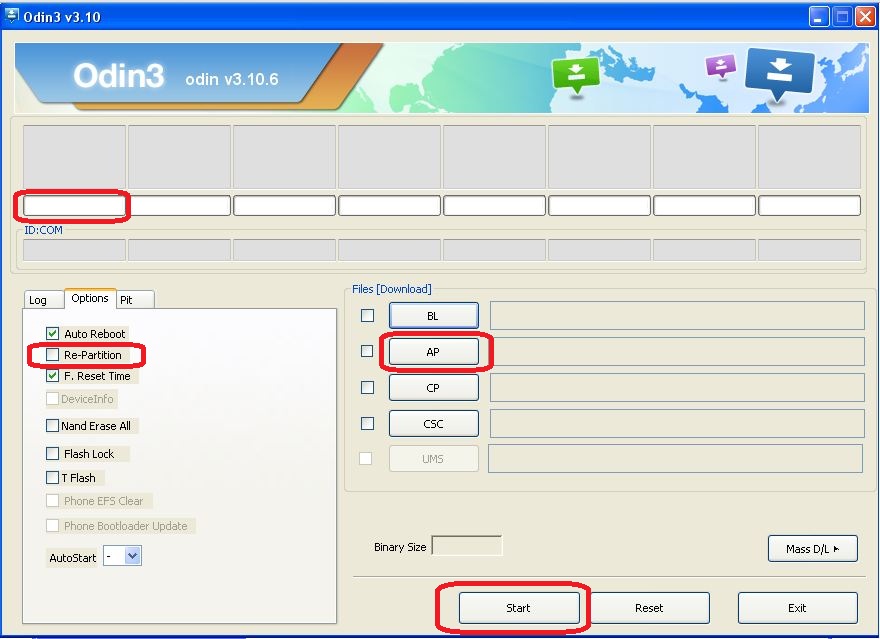
4) After properly connecting, on Odin3 screen Click on “AP” button and then select the twrp-2.8.7.0-a5ultexx-11112015.tar.md5 file, already downloaded on the PC.
5) After loading the recovery .tar.md5 file, make sure that only “F. Reset Time” box is checked and the rest are unchecked. Then click “Start” button.
6) Once the process completes and the “PASS” message displays on Odin screen, then disconnect your device cable.
7) Now turn off Galaxy A5 and boot into recovery mode, via [Press and hold Volume Up + Home + Power Key. That’s boot your device in recovery mode]
8) Once you are on recovery mode TWRP, select “Install” then locate and select SuperSU.ZIP file that you have early downloaded and copied on the device storage.> swipe at the bottom to continue installation.
9) After flashing SuperSU.ZIP file go back to recovery main menu and select “Reboot” to boot your device normally.
10) Wait for a few minutes to boot for the first time, then check SuperSU in app drawer. Also install BusyBox from Google play store on your device. update binary and then select Normal.
11) Finally install Root Checker on your device to check root status.
That’s all; this was how to install TWRP Touch Recovery and Root Galaxy A5 on Lollipop.


Leave a Comment