E7 is a famous smartphone of Samsung E lineup, released previous year. It’s a mid range phablet with excellent specs, running KitKat 4.4.4. Now the users of E7 who are interested in customization can do it with flashing Samsung Galaxy E7 TWRP. In the guidelines mentioned here, I will explain the easy method of Samsung Galaxy E7 TWRP installation. Just download the required file and flash it on E7 with Odin flash tool.

TWRP (Team-win Recovery Project) is a well-known custom recovery that offers you some additional functions. Using those functions you can do lots of customization that never available in stock recovery. TWRP is a powerful tool that can be used for installations of various types of third party apps, ROMs and rooting tools, making full Nanadroid backups etc. Here is the easy and step by step tutorial, follow the entire tutorial for flashing Samsung Galaxy E7 TWRP.
DISCLAIMER: This guide is for Samsung Galaxy E7 TWRP installation on E700H & E700F. don’t flash on other devices. You must lose the warranty of E7 with apply this guide. Follow the tutorial at your own risk.
Pre-Requisites:
- Backup of all the data on E7 is recommended, before processing.
- Before proceeding the E7 battery should have minimum 60% charge.
- Also, Install USB driver of Samsung on the PC, for E7 and PC connection. [Download Link]
- USB Debugging on E7 should be enabled. [Go to Settings > Developer options] – Full guide.
- Download the Odin latest version on your PC and extract it. [Download here].
- Download TWRP file for E7 from this link. [Download Link]. Then extract on PC.
Steps to flash Samsung Galaxy E7 TWRP
- Open Odin3 folder and double click on ‘Odin.EXE’ file to run it on the PC.
- Boot E7 on download mode- By turning off E7 and then press and hold Vol. Down+ Home+ Power buttons at the same time, release on vibration and logo appearance on the screen. Then press UP Volume button.
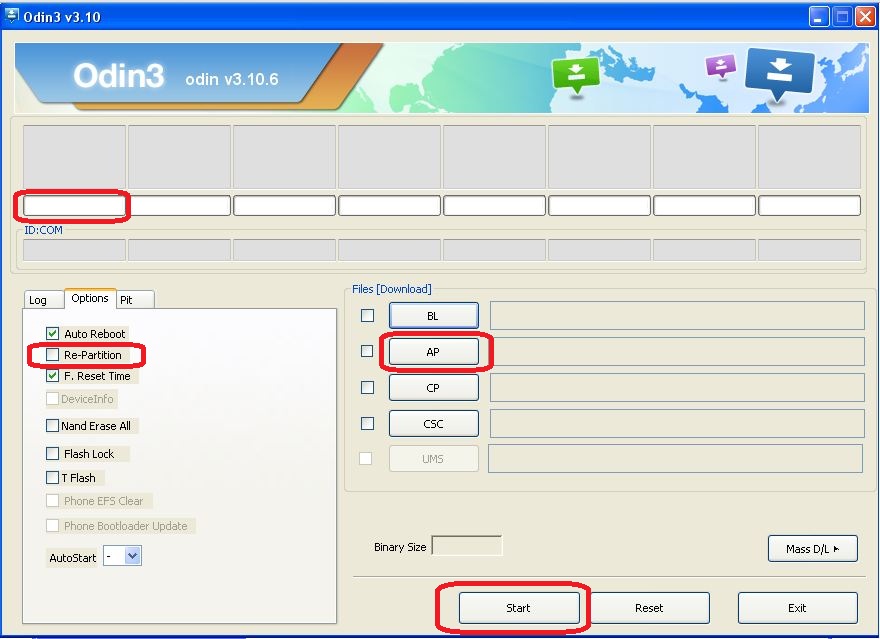
- Once E7 enter to download mode, connect E7 to PC. Odin tool would detect the E7 by turnings ID:COM blue and displays ‘Added’ Text below that. [if failed to connect then reinstall USB driver/ Change USB port]
- Upon successful connection, click ‘AP’ tab on Odin. Browse then load ‘recovery-xxx.tar.md5′ file that you have downloaded/ extracted earlier.
- Confirm that only ‘ Reset’ and ‘auto-reboot’ checkbox on Odin is selected.
- Then press ‘Start’ on Odin bottom side. Wait for process completion and ‘PASS’ message on the screen.
- E7 Reboots Now disconnect E7.
That’s how to flash Samsung Galaxy E7 TWRP.
Enjoy!


Leave a Comment