Root the latest variant of Galaxy A series “Galaxy A7 2016” via CF-Auto-Root script. Thanks to Chainfire, for developing such an easiest rooting tool. If your device running on Android 5.1.1 Lollipop and you want to root it with an easy way, then you are at the right place. Keep continue, here is the easygoing and step by step guide to root Galaxy A7 2016.

Rooting any device is an unofficial and high custom operation. But root access gives you the ultimate rights over the device. That allows you to enhance the performance of your device. After rooting the device, you can install custom recoveries, custom ROMs, custom kernels and third party apps etc. If you also need these options then root Galaxy A7 2016 and enjoy.
DISCLAIMER: Root Galaxy A7 2016 only running Android 5.1.1 Lollipop with this guide. Don’t use for other devices. Also, rooting will void your device warranty. We www.guidebeats.com will not be held responsible for any harm. Try at your own risk.
Preps| Downloads:
- Backup for the entire data on Galaxy A7 is highly recommended before proceeding.
- Galaxy A7 battery should be sufficiently charged.
- Samsung USB driver on your PC should be installed. [Download Link].
- Enable USB Debugging Mode and OEM Unlock on Galaxy A7. [Go to Settings > Developer options] – Complete guide.
- Download Odin3 flash tool latest version and extract. [Download Link].
- Download CF-Auto-Root zip file and then extract on your PC. Search here the specific file for your device [Link].
Steps to Root Galaxy A7 2016 Using CF-Auto-Root.
- Run Odin tool from the extract Odin folder. [ Double click .EXE file].
- Enter Galaxy A7 into download mode. [Turn off A7. Then keeping pressed the buttons Volume down+ Home+ Power] for a couple of seconds. Then press VOL UP on the warning.
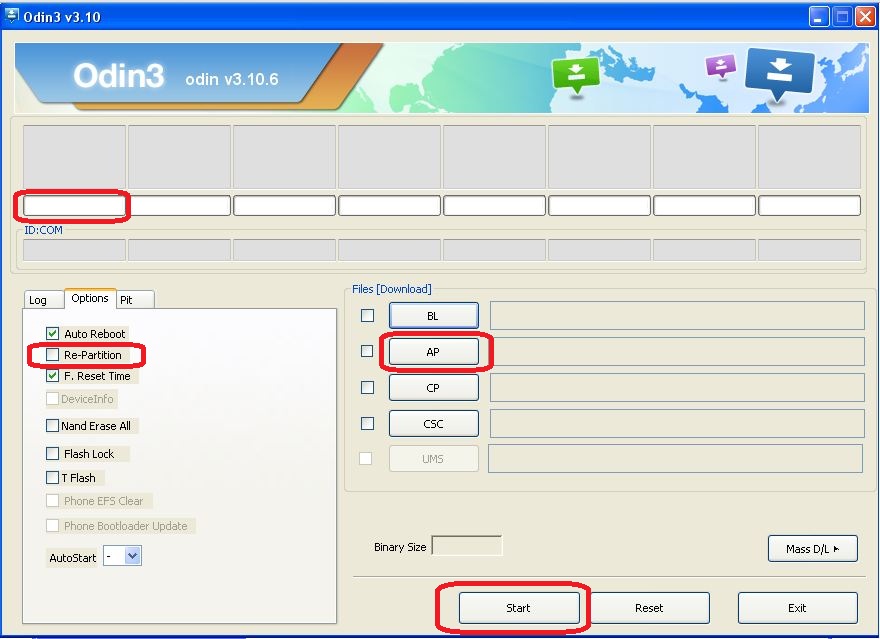
- While A7 in download mode, Connect A7 with PC and you will notice ID:COM on Odin screen turns blue with Added text below that. If not connected then reinstall USB driver or try to connect with another USB port.
- After right connectivity, press the AP button and then load CF-Auto-Root .tar.md5 root file. Also, look and confirm that Re-Partition option is unchecked.
- Now on the Odin screen press “Start” button. Wait for flashing process gets finished.
- You will find PASS text on the Odin and A7 goes auto reboot.
That’s how to root Galaxy A7 2016 on Lollipop.


Leave a Comment