Samsung A3 is the preparatory device of Galaxy A series. That derived a new attractive shape and style in the Galaxy smartphones collection. The main specs of Galaxy A3 in very much impressive. Samsung gives regular treat to all their devices. And the treat of Android 5.1.1 updates was previously received by the users. However, the users who got the updates has lost the root access. Here I have mentioned the easiest guide to Root Galaxy A3 2016 on Android 5.1.1 Lollipop.

For the purpose to Root Galaxy A3 2016, we will download and flash the chainfire CF-Auto-Root zip file. If you hold A3 2016 and interested to root it then follow this guide. Here is simple and step by step tutorial. Also, the rooting process will void your device warranty. If you still willing, then keep continue with full intention.
DISCLAIMER: Here you can Root Galaxy A3 2016 only running Android 5.1.1 Lollipop using this tutorial. Not valid for any other variant. Also, I or the developers give no guarantee for 100% results. Use all at your own risk.
Preps| Downloads:
- Perform full backup for all your important data on A3 to avoid any data loss.
- It’s also very necessary to charge your device at least 80%.
- Install the latest Samsung USB driver at your PC. [Download Link].
- Enable USB Debugging Mode on Galaxy A3. [Do it from ‘Settings’ > ‘Developer options’]. |Full Guide|.
- Also, Enable OEM if there is ‘OEM Unlock’. [Full guide].
- Download CF-Auto-Root particular for A3 from here. Search for your variant. [Download Link].
- Download Odin3 on your PC and then extract, from this link. [Click here].
Steps to Root Galaxy A3 2016 on Lollipop 5.1.1
- Once you downloaded CF-Auto-Root zip, extract it and you will find .tar.md5 root file.
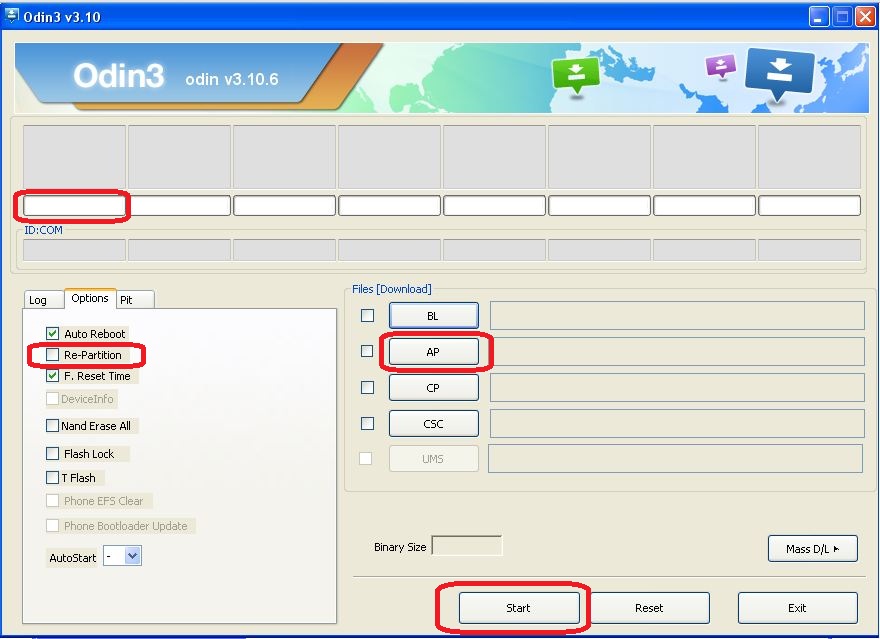
- Now on your PC, Run Odin with double clicking “10.xx.exe” file.
- Turn off A3 completely, then boot A3 into Download Mode via press and hold [Vol-Down+ Home+ Power] for a few seconds all together. Release when logo appears and then press Volume UP.
- Connect A3 with PC, while it is in download mode. Now you will see “ID:COM” port color turns blue with text “added” in box below. [if A3 not detected re-install USB driver or try other USB port]
- If A3 is connect then press “AP” button in the Odin screen. Find and add CF-Auto-Root .tar.md5 [don’t select ‘Re-Partition’ option]
- After adding root file from extracted folder, click ‘Start’ button on the Odin window, to initialize flashing process.
- This will take about 5-10 Wait for process completion.
- Next you will notice ‘PASS’ text and device reboots
- Now unplug A3 safely.
That’s how to Root Galaxy A3 2016 on Lollipop 5.1.1 using CF-Auto-Root.
Call us with your comments, if you face any issue.


![Unlock Bootloader on Oneplus 2 [Complete Guide] Unlock Bootloader on Oneplus 2 [Complete Guide]](https://d13porlzvwvs1l.cloudfront.net/wp-content/uploads/2015/09/Unlock-Bootloader-on-Oneplus-2.png)


Leave a Comment