Guidebeats is the only one to provide step by step guide for all popular devices. Nowadays Guidebeats focus on new Android 6.0 Marshmallow Operating System. The new Android 6.0 Operating System comes with amazing features and people like it. Google released the first update for his own devices Nexus 5, Nexus 6, Nexus 7, Nexus 9 and Nexus Player.
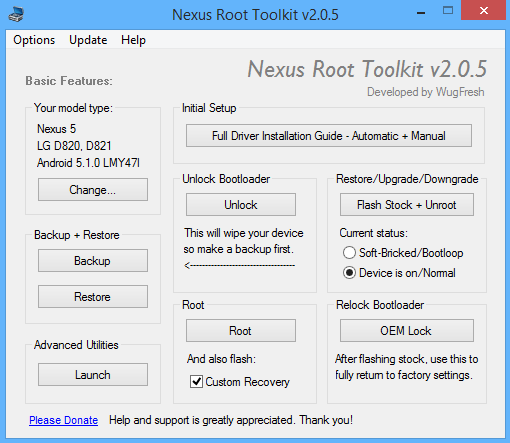
So today we decided to provide a new tutorial for Nexus 7. In this tutorial, we will show you how to root Nexus 7 [2013] (Wi-Fi) on Android 6.0 Marshmallow. All we know about rooting device benefits. Once your device rooted then you can easily access system files. In this guide, we will use the new rooting tool knows as Wug’s Nexus Root Toolkit. Using this tool we can easily root the Nexus 7 device with one click. If you want to install the custom recovery or TWRP Recovery so you can easily install by using this tool. If you have unrooted Nexus 7 and want to root so you are on right place. In this post, I will show you how to root Nexus 7 step by step. So let’s start the procedure.
Contents
Disclaimer: – This Guide is intended only for the Nexus 7 (2013). Flashing custom recovery & rooting the device void its warranty. In case of an issue, GuideBeats may not be held responsible. Make sure that you are doing everything at your own risk and with your complete understanding.
Preparation:
1. Backup your device important data.
2. Make sure your Nexus 7 device have at least 60% battery power.
3. Make sure the USB Debugging is enabled.
4. Download USB Drivers For Nexus 7: Link
5. Download Wug’s Nexus Root Toolkit v2.0.5: Link
How To Root Nexus 7 2013 (Wi-Fi) On Official Android 6.0 Marshmallow:
Step No 1: First of all, connect your Nexus 7 device to PC.
Step No 2: After connected, then open Wug’s Nexus Root Toolkit v2.0.5. Wait few seconds to allow toolkit recognize your Nexus device then, on the main screen: Options “Hotkey Ctrl+k” => Root Options => Superuser Options
* Enable “Utilize SuperSU by Chainfire”
* Enable “Utilize Latest Beta Version Available”
* Now Press “Ok” to apply your settings.
Step No 3: Now click on Root button to start the rooting process.
Congrats! Now your Nexus 7 (2013) is rooted on latest Android 6.0
Marshmallow.


![Update Honor 7 UL00 to Marshmallow EMUI 4.0 B330 Stable Firmware [India] Update Honor 7 UL00 to Marshmallow EMUI 4.0 B330 Stable Firmware](https://d13porlzvwvs1l.cloudfront.net/wp-content/uploads/2016/03/Update-Honor-7-UL00-to-Marshmallow-EMUI-4.0-B330-Stable-Firmware-India.jpg)


![Update Honor 7 L01 to Android 6.0 Marshmallow [EMUI 4.0] Beta OTA B311 official firmware -Russia Update Honor 7 L01 to Android 6.0 Marshmallow [EMUI 4.0] Beta](https://d13porlzvwvs1l.cloudfront.net/wp-content/uploads/2016/03/Update-Honor-7-L01-to-Android-6.0-Marshmallow-EMUI-4.0-Beta-OTA-B311-firmware-Russia.jpg)

Leave a Comment